George Mason University Antonin Scalia Law School

Adding a New Gravity Form in WordPress

Steps for adding a new Gravity Form in WordPress:

  1. In WordPress nav bar, choose Forms (with Gravity Forms logo), then choose New Form
  2. Add Fields and update Field Settings (e.g., make a field required). Save Form and Preview it (top right)
  3. At the top of the Form Editor are Settings and Entries. Completed form submissions are located in Entries. In Settings are Form Settings, Confirmations, and Notifications:
    • Form Settings may be adjusted as needed
    • Confirmations are what the user sees after submitting the form. Defaults to Text and may be updated to Text, Page, or Redirect (use Redirect to send user to an external page after submitting the form). Conditional logic is also possible
    • Notifications are sent to admin by default when a form has been submitted (this includes tests in Preview). In Admin Notification, update ‘Send to Email’ field to update email address that will receive a notification when a form is submitted. Update other fields if needed. If needed, Configure Routing to send notifications conditionally based on form Field responses (be sure to update the ‘Any/All’ dropdown to reflect the desired logic)
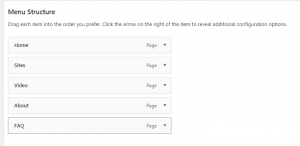
  4. Create a Page for the form by clicking Pages, then Add New in left nav bar
  5. In the new page, add a title, which will autogenerate a permalink (editable)
  6. In the new page, add a shortcode to the Paragraph section to display the Gravity Form on the page. Copy shortcode from an existing page, replacing “ID” with the ID of the new Gravity Form (found in Forms area; see #1 above)
  7. Preview, then Publish page when ready. Share form via permalink (see #5 above)

How to Connect Google Sheets to Contact Forms

After creating your form, click on the Google Sheets tab:


On your Google Drive account, create a new Google Sheet. Save it as something memorable.

You will need to grab the name of the sheet, the Google Sheet ID (directly from the URL of the sheet), and the Tab name (default is Sheet1).

Paste it in the fields below:


Once you have that, map the column names to the form field names you’ve chosen for your form. Pay close attention to the order of the field names. As you go down the form grabbing names, you need to paste them into the first row, moving from column to column, left to right.

Examples of the fieldnames below:


Test your form first to make sure the data is being pulled into your Google Sheet before releasing the form.

Kiosk Database List

The Kiosk page is handled by a MODx Ditto. Each entry can be found within the “Find Books, Articles, and Databases” bucket inside the MODx Tree.

To edit the description of an individual entry, navigate to the Template Variables tab, click on “Library” and edit the Description field. Make sure not to include any HTML code inside this field.

List All Sites Using Custom Shortcode

Shortcodes make it easier to customize wordpress pages quickly. WordPress comes with pre-built shortcodes but we’re going to build one from scratch. You will need to add a function to your child theme’s functions.php file. This particular code builds an ordered list of all our wordpress sites under our sls.gmu.edu domain using the get_sites() function. This function will work on all WP platforms 4.3 and above.


/*
* Author: Matthew
* This function creates a shortcode usable in all sites using the scalia law theme to create an ordered list of
all multisites
*/
function scalia_list_sites() {

$subsites = get_sites(); //creates variable using get_sites

if ( ! empty ( $subsites ) ) {

$html = '

    '; //sets up class

    foreach( $subsites as $subsite ) {

    $subsite_id = $subsite->blog_id; //finds sites by id
    $subsite_name = get_blog_details( $subsite_id )->blogname; //creates variable for site name
    $subsite_link = get_blog_details( $subsite_id )->siteurl; //creates variable for site url
    $html .= '< li class="site-' . $subsite_id . '">< a href="' . $subsite_link . '">' . $subsite_name . '< /a >< /li >'; //builds individual list items
    sort($html);
    }

    $html .= '< /ol >';

    return $html; //returns the list

    }

    }
    add_shortcode('scalia_list', 'scalia_list_sites'); //calls function and sets up [ scalia_list ] custom short code

    This goes in your child-theme’s functions.php file.

Using WordPress: Tips For Editors


How do I sign into Scalia Law Sites remotely?

Users must download a VPN client from the IT Services Downloads page. For iOS or Android devices, install the Cisco AnyConnect client through the appropriate app store.

Instructions for Windows
Instructions for Mac

Once installed, enter your desired the URL for your VPN group in the format vpn.gmu.edu/<group>. If you do not know your specific VPN group or do not have one, you may enter vpn.gmu.edu and click Connect.  Select GENERAL from the Group list and login with your NetID and Patriot Pass password. See VPN Groups for additional information and how to determine your group.

I can’t sign in because of 2FA. What is that and how can I get it?

Two-Factor Authentication (2FA) is required to connect to the VPN. If you are a Mason employee who uses the VPN to access Mason resources, you are encouraged to enroll in 2FA. This tool allows Mason employees to verify who they are before connecting to protected networks. An alert will go to your cell phone if you or someone else attempts to login using your credentials. You will then be prompted to approve or deny entry.

Enroll in 2FA .

How do I administer the site and take care of my content?

A user must first be given access to the site by the Director of Design and Web Services. Once an account has been created, simply add “/wp-login.php” to the end of the URL of the site you are working on. For example, to sign into sls.gmu.edu, the link would be sls.gmu.edu/wp-login.php.

How do I use the WordPress Dashboard?

Please refer to this short six minute video to get an overview of the WordPress Dashboard.

A more comprehensive look at the WordPress Dashboard is found below:

Of course, we are here to help. If you have any questions, please contact one the web administrators and we’ll gladly walk you through the process.

The Menu settings are found on the left side of the WordPress Dashboard under Appearance->Menus.

To the left of this page you will see various categories of items you may add to the Menu, such as pages or custom links. Simply check off the page you would like to add and click on Add to Menu for pages, or copy and paste a URL and give it a title under custom links.

Once the Page or Link has been added to the Menu Structure window to the right, you may drag your selection up or down to prioritize your menu items. Dragging the item slightly to the right while under another item will create a child/parent item relationship making organization of links easier than ever.

Sidebar content is called a Widget in WordPress nomenclature. Widgets can be found under Appearance-> Widgets. In order to add sidebar content to a page, you must first create the Widget in the Sidebar category.

Once the content has been created, you will need to add to the page. Under every editor view of a page, you will see the Custom Sidebar menu. Activate it by checking off the menu item, then select the Sidebar Radio button.

How do I embed videos from YouTube and Vimeo?

On any YouTube video, click on the Share button underneath the subscribe button. From there, simply copy and paste the Share link into the Edit Page window.

For Vimeo, copy the video URL and paste it into the Edit Page window. Example:

https://vimeo.com/220470204

Simple Steps to Secure WordPress Site

  1. Keep WordPress updated
  2. Keep plugins updated
  3. Only use trusted plugins
  4. Only use trusted themes
  5. Choose a secure password
  6. No “admin” username
  7. Decent hosting
  8. Keep regular backups
  9. Restrict login attempts (use iThemes Security)
  10. Switch on SSL encryption
  11. Change database prefix
  12. Two-factor authentication (use Google Authenticator)
  13. Monitor what’s happening
  14. Block access to system files

    # protect files
    <files wp-config.php>
    Order deny,allow
    Deny from all
    </files>
    <files readme.html>
    Order allow,deny
    Deny from all
    </files>
    <files license.txt>
    Order allow,deny
    Deny from all
    </files>
    <files install.php>
    Order allow,deny
    Deny from all
    </files>
    <files error_log>
    Order allow,deny
    Deny from all
    </files>

    # Block the include-only files.
    <IfModule mod_rewrite.c>
    RewriteEngine On
    RewriteBase /
    RewriteRule ^wp-admin/includes/ - [F,L]
    RewriteRule !^wp-includes/ - [S=3]
    RewriteRule ^wp-includes/[^/]+\.php$ - [F,L]
    RewriteRule ^wp-includes/js/tinymce/langs/.+\.php - [F,L]
    RewriteRule ^wp-includes/theme-compat/ - [F,L]
    </IfModule>

  15. Build your own firewall
  16. Hide .htaccess file
    # STRONG HTACCESS PROTECTION
    <Files ~ "^.*\.([Hh][Tt][Aa])">
    order allow, deny
    deny from all
    satisfy all
    </Files>
  17. Protect WP-Admin area
  18. Block PHP in uploads folder
    <Files *.php> Deny from All </Files>
  19. Tighten PHP configuration
    ; Disable allow_url_fopen in php.ini for security reasons
    allow_url_fopen = Off
    ; Disable allow_url_include in php.ini for security reasons
    allow_url_include = Off
    ; Disable display_errors in php.ini for security reasons
    display_errors = Off
    log_errors = On
  20. Create your own encryption keys
  21. Folder permissions

Source: Primary Image

phpCAS and WordPress

Make sure your account is in the “Administrator” role, as you won’t be able to login as admin after switching to CAS.

1. Download phpCAS and unzip/untar it: https://wiki.jasig.org/display/CASC/phpCAS

2. Download wpcas.zip and unzip it in wp-content/plugins

3. edit wp-content/plugins/wpcas/wpcas.php and remove or comment out line 57:

/* $wpcas_options['server_path'] == '' || */

4. Create wp-content/plugins/wpcas/wpcas-conf.php with the following content (change “/path/to” to the path to CAS.php that you installed in step 1):

<?php

// the configuration array

$wpcas_options = array(

'cas_version' => 'S1',

'include_path' => '/path/to/CAS.php',

'server_hostname' => 'login.gmu.edu',

'server_port' => '443',

'server_path' => ''

);

// this function gets executed

// if the CAS username doesn't match a username in WordPress

function wpcas_nowpuser( $user_name ){

die('you do not have permission here');

}

?>

4. Login with an account that’s in the Administrator role.  In “Plugins”, activate the wpCAS plugin.

5. If possible, test in a separate browser.  When you click “Log in” you should be redirected to https://login.gmu.edu.  Type in your PatriotPass NetID and password.  You should be redirected back to your WordPress site.