- From the top right (hamburger) menu icon > Sites. You can select multiple sites to publish, however you cannot select which destinations to publish to, it will publish to all enabled and checked by default destinations. If you need to select the destinations, you can right click on the site name and select Publish. Then you will get a destination selection window.
- If you are in a site, you can publish it from Manage Site > More > Publish.
- If you are in a site in the Site Content area, you can publish the top level folder, either from the right click menu or navigate to the folder and use the publish button near the top right.
Category: Web Development
Emergency Alert Message
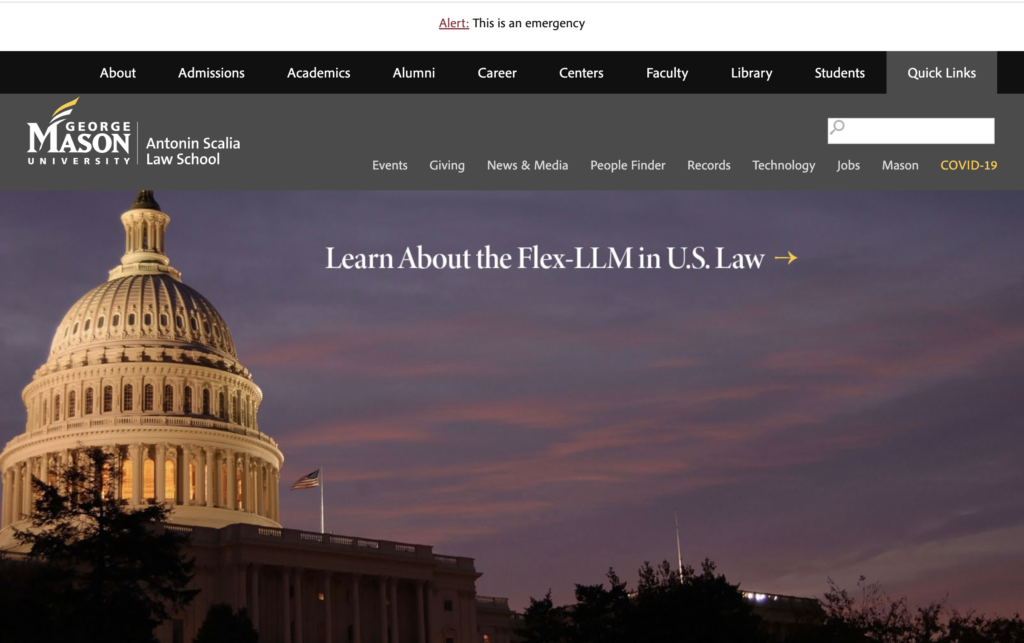
In case of an emergency, we have implemented an alert message that would appear on every page at law.gmu.edu. Here’s an example:
To Activate the Emergency Alert Message
- Log into MODX Manager, navigate to the Emergency container (id#12996), and open up the Emergency Message resource (id#12996).
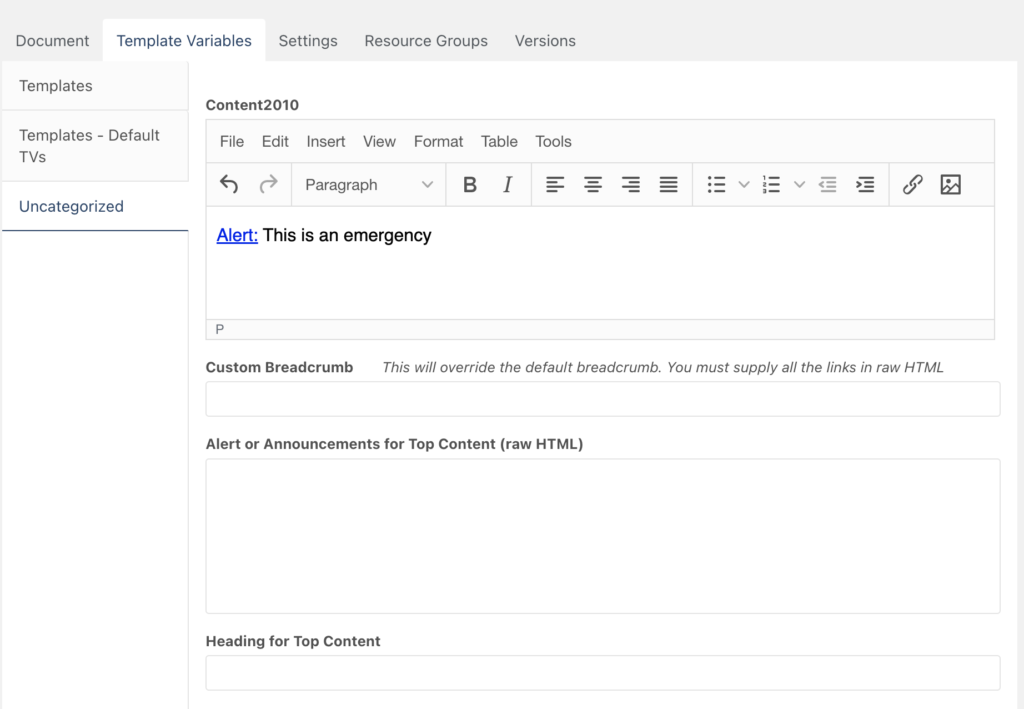
- Go to the Template Variables tab, select the Uncategorized tab on the left. Write an emergency alert message in the Content2010 box, which is the first box. Return to the Document tab, click on the Published button, then hit the Save button.
- Search for the 2012_template_top chunk, scroll down to this line (around line 29):
[[-getResources? &parents=`12995` &depth=`1` &tpl=`emergency_alert` &tvPrefix=`` &includeTVs=`1` &limit=`1` ]]
Remove the first hyphen (-) to activate GetResources. (Because we hardly used this emergency alert message, activating this snippet might affect the site performance when we are not using it)
To Deactivate the Emergency Alert Message
To deactivate the Emergency Alert Message, simply unpublished the Emergency Message resource (id#12996). Comment out the GetResource snippet (by adding the hyphen back into the 2012_template_top chunk) is not required, but a good practice to prevent an extra dynamic call.
CSS Style
CSS style for emergency alert can be modified in the emergency_alert chunk.
Adding Courses to Focus Areas Dynamically
To add a course to the JD Focus Areas & Concentrations, go to the specific course page under the Course Descriptions directory, navigate to the Template Variables tab, stay on the Courses tab,
scroll down to the Focus Areas & Concentrations TV (course_focus_areas _concentrations
), then check the appropriate box.

Input Option Values
The following input values are placed in course_focus_areas _concentrations
TV:
Administrative Law and Government Regulation==administration_government||Antitrust Law==antitrust||Business & Financial Regulation==business_financial||Constitutional Law==constitutional||Criminal Law and Procedure==criminal_procedure||Cyber Law==cyber||Environmental & Energy Law=environmental_energy||Family Law and Estate Planning==family_estate||Immigration & Human Rights Law==immigration_human_rights||Intellectual Property==intellectual_property||International & Comparative Law==international_comparative||Labor & Employment Law==labor_employment||Law & Economics==law_economics||Litigation & Alternative Dispute Resolution==litigation_alternative_depute||National Security Law and Policy==national_security||Patent Law==patent||Public Interest Law==public_interest||Tax Law==tax
Here’s the chunk called focus_areas_concentrations_list
:
<li><a href="[[~[[+id]]]]">[[+pagetitle]]</a></li>
Here’s the getResources
:
<ul>
[[getResources? &parents=`14` &tpl=`focus_areas_concentrations_list` &limit=`0` &showHidden=`0` &depth=`2` &includeTVs=`1` &tvPrefix=`` &tvFilters=`%administration_government%` &sortbyTV=`course_number` &sortdirTV=`ASC`]]
</ul>
Layout Guides for the Law School Main Website
Here are some quick layout guides for the main law school website.
To create a simple button (see visit campus page), add the button
class.
<div class="button">
<a href=""></a>
</div>
To create three buttons in three columns with three different colors (see homepage), add grid3
and color-buttons
classes:
<div class="grid3 color-buttons">
<a href=""></a>
<a href=""></a>
<a href=""></a>
</div>
To create four boxes in four columns with four different colors, (see homepage), add grid4
, color-buttons
, and boxes
classes:
<div class="grid4 color-buttons boxes">
<a href=""></a>
<a href=""></a>
<a href=""></a>
<a href=""></a>
</div>
For a two-column layout (see the top of the People Finder page), use the grid2
class:
<div class="grid2">
<section></section>
<section></section>
</div>
For a three-column layout (see contact information on the Records Office page), use the grid3
class:
<div class="grid3">
<section></section>
<section></section>
<section></section>
</div>
For a four-column layout (see icons on the Career page), use the grid4
class:
<div class="grid4">
<section></section>
<section></section>
<section></section>
<section></section>
</div>
For a two-column layout with one column takes up two-third of the space (see JD Admissions page) , add span2
class on that column:
<div class="grid3">
<section></section>
<section class="span2"></section>
</div>
For a two-column layout with one column takes up three-forth of the space (see the footer link and social media link at the bottom of the footer) , add span3
class on that column:
<div class="grid4">
<section class="span3"></section>
<section></section>
</div>
To add icons for the second level pages (see Admissions landing page), use the icons24
(24 is the dimension in pixels that all the icons were downloaded) class:
<div class="grid3 icons24">
<a href=""><img src="" width="50" alt=""></a>
</div>
How to Connect Google Sheets to Contact Forms
After creating your form, click on the Google Sheets tab:
On your Google Drive account, create a new Google Sheet. Save it as something memorable.
You will need to grab the name of the sheet, the Google Sheet ID (directly from the URL of the sheet), and the Tab name (default is Sheet1).
Paste it in the fields below:
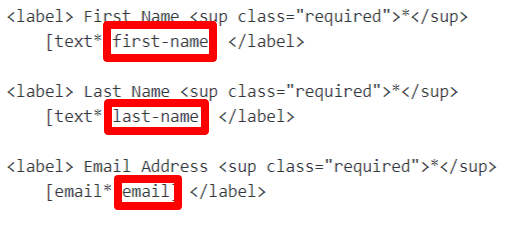
Once you have that, map the column names to the form field names you’ve chosen for your form. Pay close attention to the order of the field names. As you go down the form grabbing names, you need to paste them into the first row, moving from column to column, left to right.
Examples of the fieldnames below:
Test your form first to make sure the data is being pulled into your Google Sheet before releasing the form.
Setting up an RSS Feed Parser in MODX
MODX uses an add-on called getFeed to parse RSS content.
In order to use it, place this code on your page template (example uses the Faculty News Feed):
[[!getFeed?
&url=`https://sls.gmu.edu/faculty-news/feed/`
&tpl=`RSSFeedParser`
&limit=`1`
]]
The code pulls the RSSFeedParser, a custom chunk we made that pulls the most recent article title and link.
Titles are pulled using:
[[+title]]
Links are pulled using:
[[+link]]
Here is a list of other data fields that may be pulled from the RSS Feed, if available:
- title – The title of the post.
- link – A direct link to the post.
- description – The description of the post.
- pubdate – The date the post was published.
- guid – The GUID of the post.
- author – The name of the author of the post.
- category – Any tags or category associations the post has.
- summary – A short summary of the post.
- date_timestamp – The timestamp of the post.
Like most MODx variables, wrap the data fields with double square brackets, but be sure to use the + sign prefix rather than the * symbol.
Full-Time Faculty Table
The Full Time Faculty Table implements one ditto that calls two separate chunks.
The chunks are:
ditto.people_finder.odd.tr.2018
and
ditto.people_finder.even.tr.2018
The structure of both dittos are the same, with only the row background color being different using the existing even and odd classes within the main style sheet.
When calling the ditto, filter the results using:
&parents=`5842,1794`
This sorts the list based on Faculty Type.
When adding fields use the + sign instead of the usual *, so to add the professor’s title, it would look like this:
[[+title_main]]
To integrate a link, use this format:
<a href="mailto:[[+email]]"">[[+email]] </a>
Main Site Top Navigation Bar
Assigning new pages to different sections of the site are done within the resource itself under Template Variables.
However, adding sections to the Top Navigation Bar requires manually editing a Chunks within MODX.
To add a new Admissions Program to the Admissions section, for example, Navigate to Elements, select Chunks, then Navigation, and select the nav_admissions chunk to manually add the page. Be sure to use Resource IDs in place of the URL.
Working Paper Authors Who Are Not GMU Faculty
Use this link as a template to create authors who do not work as gmu faculty, but need to be added to the author list for Faculty Working Papers:
https://www.law.gmu.edu/manager/?a=resource/update&id=3329
Trouble Viewing Published Material on MODx?
If you’re making an edit to an existing page that has been unpublished in the past, be sure to take an extra look at the “Hide Template Variables on Output” field.
The field is located under most page templates under Template Variables -> Templates – Default TVs:
It varies, but the field in most page templates can be found at the very bottom of the page:
A Template Variable or TV, is simply what MODx calls a custom field found in page creation forms. When this field is set to “Yes” and the page is published, no content will be viewable.
This field is set to “No” by default and should not be a problem when creating new content.