
- The slide should be a 2400px x 1500px jpg file.
- If the slide is sent in PowerPoint format, you can either take a screenshot of the slide and crop it to this size, or open in PPT and click File —> Export —> File Format [choose JPG]. This will show you the dimensions of the slide if you export it.
- Note: If taking a screenshot, first make sure that any words highlighted by spell check are approved so that the red underline does not appear in the image.
- If it’s not 2400px x 1500px in Export, you can modify the dimensions: Design —> Slide Size —> Page Setup —> Slide Sized For. Choose this dropdown option: “On-screen Show 16:10”. If you do not see this option, you can choose Slide Size and enter Width=2400px and Height=1500px.
- Make sure logos follow Branding Guidelines.
- Make sure everything scaled properly (you may need to resize images and/or realign text) and then export as JPG.
- Navigate to the Events admin site.
- In left nav bar, choose Soliloquy
- Click on the Soliloquy Slider named “Images Slider”
- In “Drag and Drop Files to Upload”, click “Select Files from Your Computer”
- Upload the 2400px x 1500px jpg file
- It make take a minute to load, but the slide will appear in “Currently in Your Slider”. It will automatically be placed at the end of the current slide rotations (drag and move it to a different spot in the rotation).
- To set the start and stop date for when you want the slide to play, click on the blue box with the pencil icon in the top right corner of the new slide. Check the “Schedule Slide?” box. Enter a “Start Date” and “End Date”. Make sure to choose the time of day in each. Click Save Metadata.
- Now that the slide has been added and scheduled, in the Publish box in the top right corner, click Update.
- Clear the cache (ask Donny for the link).
- If you added the slide to play immediately, check to see if the slide is playing.
How to Disable Plugins Outside MODX Manager
Since we are using CAS Authentication plugin to add an extra security layer to our MODX Manager, we need a way to disable the plugin in case something goes wrong and we don’t want to get locked out of our own site. Here are the steps to disable plugins outside the Manager:
- Log into the cloud dashboard and temporarily add phpMyAdmin to the cloud
- Log into phpMyAdmin, browse the
modx_site_pluginstable for the CAS plugin, double-click on thedisablecolumn to change the value from 0 to 1 to disable the plugin - Manually clear the cache by logging into sFTP and delete everything in the
core/cachedirectory - Log back into the cloud dashboard to turn off phpMyAdmin
Create Course Schedule HTML Table Using R
Referenced in steps below: Course Schedule Instructions.
- Save a copy of the original Excel file to come back to later for the Notes sections.
- Open up the original Excel file, merge multiple faculty into one row, then delete all the empty rows.
- Make sure columns are identical to the column names in script (do not include Room Number or First Name of Instructor). Delete hidden columns (Room Number, First Name of Instructor, etc.). Make sure column names match these: CRN#, CRS#, SEC, Course Title, Instructor, Cr Hr, Days, Time, Room, Exam Date, Exam Time
- Make sure footnotes are standardized, e.g., (E) and not (E ) with a space (Update: script has been updated to account for this)
- Remove all rows that are not the table header (first row) or the courses.
- Save DAY and EVE sheets each as two new csvs by highlighting all cells with data and copying/pasting them into a new file/save as csv (to avoid extra blank columns that may be present by saving entire sheet). Do not open them (especially in Excel) once they are saved, because this may change how the Section numbers are interpreted and may cause 001 to be 1, and so forth.
- The R code below covers Steps 2 – 6 in Course Schedule Instructions to create the HTML table.
- In R code, update the “dayNotes” variable to match the number of Day Notes. Update the file paths/names for input files and output file.
- Paste output into an HTML editor. Copy and paste notes from the copy of the original Excel file to the bottom of the HTML page.
- Once everything looks good, paste into MODX.
Creating a Spreadsheet for Full-time Faculty
A request to pull the following information from the full-time faculty directory:
- Last Name
- First Name
- Title
- Degrees and Schools
- SSRN link
- Subjects taught
- Area(s) of Expertise
- CV (PDF link if they have one posted)
- Bio (link to profile page)
Create a chunk (ditto.faculty_list_2021_ABA) using tr and td tags:
<tr>

<td>[[+lname]]</td>

<td>[[+pref_name:default=`[[+fname]]`]]</td>

<td>[[+title_main]]</td>

<td>[[+degree6:isnot=``:then=`[[+degree6:ReplaceDegrees]]`]][[+alma_mater6:isnot=``:then=`, [[+alma_mater6]]; `]][[+degree5:isnot=``:then=`[[+degree5:ReplaceDegrees]]`]][[+alma_mater5:isnot=``:then=`, [[+alma_mater5]]; `]][[+degree4:isnot=``:then=`[[+degree4:ReplaceDegrees]]`]][[+alma_mater4:isnot=``:then=`, [[+alma_mater4]]; `]][[+degree3:isnot=``:then=`[[+degree3:ReplaceDegrees]]`]][[+alma_mater3:isnot=``:then=`, [[+alma_mater3]]; `]][[+degree2:isnot=``:then=`[[+degree2:ReplaceDegrees]]`]][[+alma_mater2:isnot=``:then=`, [[+alma_mater2]]; `]][[+degree1:ReplaceDegrees]][[+alma_mater1:isnot=``:then=`, [[+alma_mater1]]`]]</td>

<td>[[+ssrn:isnot=``:then=`https://ssrn.com/author=[[+ssrn]]`]]</td>

<td>[[+faculty_subject_category:convert_ids_to_pagetitles_1]]</td>

<td>[[+expertise:convert_output_list_1]]</td>

<td>[[+cv_pdf:isnot=``:then=`https://www.law.gmu.edu/[[+cv_pdf]]`]]</td>

<td>[[+email]]</td>

<td>https://www.law.gmu.edu/faculty/directory/fulltime/[[+alias]]</td>

</tr>
The square brackets ([[+lname]]) correspond with the form field inside MODX. To see how the fields were created, take a look at the 2015_faculty_profile chunk.
After creating the ditto.faculty_list_2021_ABA chunk, put it inside the script below:
<table>

[[getResources? &showHidden=`1` &includeTVs=`1` &tvPrefix=`` &limit=`0` &sortbyTV=`lname` &sortdirTV=`ASC` &parents=`5842` &depth=`1` &tpl=`ditto.faculty_list_2021_ABA` &sortBy=`lname` &sortDir=`ASC` &display=`all` &filter=`hide_all,1,2`]]

</table>
Past the script above on any page inside MODX to populate the table. The tag &parents=`5842` refers to the ID number of the full-time faculty directory.
Adding a New Gravity Form in WordPress
Steps for adding a new Gravity Form in WordPress:
- In WordPress nav bar, choose Forms (with Gravity Forms logo), then choose New Form
- Add Fields and update Field Settings (e.g., make a field required). Save Form and Preview it (top right)
- At the top of the Form Editor are Settings and Entries. Completed form submissions are located in Entries. In Settings are Form Settings, Confirmations, and Notifications:
- Form Settings may be adjusted as needed
- Confirmations are what the user sees after submitting the form. Defaults to Text and may be updated to Text, Page, or Redirect (use Redirect to send user to an external page after submitting the form). Conditional logic is also possible
- Notifications are sent to admin by default when a form has been submitted (this includes tests in Preview). In Admin Notification, update ‘Send to Email’ field to update email address that will receive a notification when a form is submitted. Update other fields if needed. If needed, Configure Routing to send notifications conditionally based on form Field responses (be sure to update the ‘Any/All’ dropdown to reflect the desired logic)
- Create a Page for the form by clicking Pages, then Add New in left nav bar
- In the new page, add a title, which will autogenerate a permalink (editable)
- In the new page, add a shortcode to the Paragraph section to display the Gravity Form on the page. Copy shortcode from an existing page, replacing “ID” with the ID of the new Gravity Form (found in Forms area; see #1 above)
- Preview, then Publish page when ready. Share form via permalink (see #5 above)
How to Create a New Event
Instructions for adding an event to our Calendar of Events. Please note that we only publish events that are open to law students, faculty, and staff. Our target audience for the public calendar is law students. Please do not list private or “by invitation only” events on here.
- Login into the Calendar of Events website. If you access the website outside of the George Mason network, you would need to log into our VPN first.
- From the Event section on the left-hand menu or the drop-down menu at the top, choose Add Event.
- Add Title, Description, Time & Date, Location (check to see if the location existed), Organizers (check to see if the organizer existed), and Event URL.
- Ignore Event Cost, Excerpt, Custom Field, and Slugs.
- For Discussion, uncheck Allow comments.
- For Event Categories, check all that are appropriate or add new category if necessary.
- For Event Options, leave it blank unless you want to hide it from listing.
- Ignore Custom header.
- For Featured image, please crop your image to 1200px x 675px for consistency.
- Hit Publish when you are finished.
Image Sizes for Scalia Law Websites
A quick reference for image sizes on Scalia Law websites. The measurements are in px unit. The dimensions are listed as width by height: w x h.
Banners for the Main Site in Cascade
Most banners, including profile pages: 1800 by 900
Banners for the Main Site
- Homepage sliders: 1140 x 700
- Faculty banner: 1140 x 600
- Second-level banner: 1140 x 500
- Third-level banner: 1140 x 400
Spotlights & In the News
- Thumbnails: 400 x 250
- Full spotlight photo: 750 x 450
- Half spotlight photo: 400 x 250 or optional height
Icons
- SVG icons: 24 x 24
Banner for WordPress Sites
- Homepage sliders: 1200 x 500
- Second-level banner: 1200 x 400
- Third-level banner: 1200 x 300
- Thumbnails: 400 x 250
- Feature image for Events 1200 x 675 (or 1920 x 1080)
Layout Guides for the Law School Main Website
Here are some quick layout guides for the main law school website.
To create a simple button (see visit campus page), add the button class.
<div class="button">
	<a href=""></a>
</div>
To create three buttons in three columns with three different colors (see homepage), add grid3 and color-buttons classes:
<div class="grid3 color-buttons">
	<a href=""></a>
	<a href=""></a>
	<a href=""></a>
</div>
To create four boxes in four columns with four different colors, (see homepage), add grid4, color-buttons, and boxes classes:
<div class="grid4 color-buttons boxes">
	<a href=""></a>
	<a href=""></a>
	<a href=""></a>
	<a href=""></a>
</div>
For a two-column layout (see the top of the People Finder page), use the grid2 class:
<div class="grid2">
	<section></section>
	<section></section>
</div>
For a three-column layout (see contact information on the Records Office page), use the grid3 class:
<div class="grid3">
	<section></section>
	<section></section>
	<section></section>
</div>
For a four-column layout (see icons on the Career page), use the grid4 class:
<div class="grid4">
	<section></section>
	<section></section>
	<section></section>
	<section></section>
</div>
For a two-column layout with one column takes up two-third of the space (see JD Admissions page) , add span2 class on that column:
<div class="grid3">
        <section></section>
	<section class="span2"></section>
</div>
For a two-column layout with one column takes up three-forth of the space (see the footer link and social media link at the bottom of the footer) , add span3 class on that column:
<div class="grid4">
	<section class="span3"></section>
	<section></section>
</div>
To add icons for the second level pages (see Admissions landing page), use the icons24 (24 is the dimension in pixels that all the icons were downloaded) class:
<div class="grid3 icons24">
	<a href=""><img src="" width="50" alt=""></a>
	<a href=""><img src="" width="50" alt=""></a>
	<a href=""><img src="" width="50" alt=""></a>
</div>
Instructions for Restoring Course Schedules in MODX
- Duplicate the entire course schedule directory. For example: 2016 Course Schedule and rename it to 2015 Course Schedule.
- Open up the directory you just copied, select Duplicate of 2016 Fall. Rename
TitleandLong Titleto 2015 Fall. RenameSource Aliasto 2015_fall. - Open up the static HTML page.
- Search
../../..and replace with nothing (blank). - Search for
.htmland replace with nothing (blank). - Search for
../../courses/and replace with/academics/courses/ - Search
<img class="icon" src="assets/images/icons/pdf.png" alt="PDF file" width="16" height="16" />and replace with nothing (blank). - Search
<br /><img src="/assets/images/icons/weather_sun.png" alt="" width="16" height="16" />and replace with nothing (blank). - Search
<br /><img src="/assets/images/icons/moon.png" alt="" width="16" height="16" />and replace with nothing (blank). - Replace
<img src="/assets/images/icons/pencil.png" alt="" width="16" height="16" />and replace with nothing (blank). - Copy the page starting from the list (
ul) all the way down to the end of the table (<!-- END HERE-->). - Add this class
<div class="table-wrap">before the openingtableelement and</div>after the closingtableelement to make the page responsive.
For anchor links on pages prior to modx, replace:
2000fall.html#
with:
[[~[[*id]]]]#
Add this to the top:
<ul>
<li><a href="[[~[[*id]]]]#schedule">Schedule</a></li>
<li><a href="[[~[[*id]]]]#assignments">Assignments</a></li>
<li><a href="[[~2481]]">Archives</a></li>
</ul>
Remove the following entirely:
<img src="https://www.law.gmu.edu/images/new.gif" alt="" width="25" height="12" border="0">
<img src="assets/images/icons/pdf.gif" alt="PDF Document" width="16" height="16" />
<span style="font-family: Arial,Helvetica,sans-serif;">
<span>
</span>
_2012summer001.html
Replace:
../../courses/
with
/academics/courses/
How to Connect Google Sheets to Contact Forms
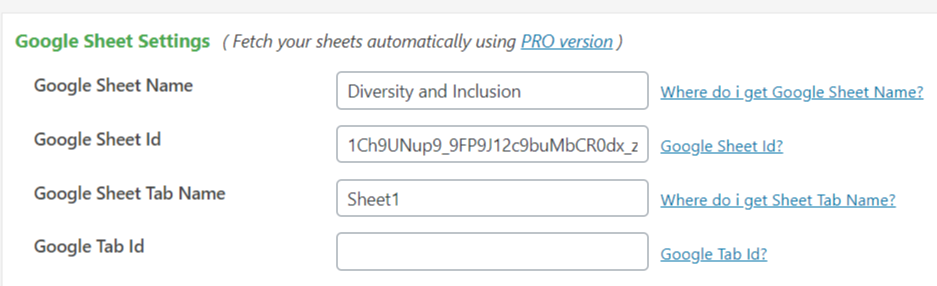
After creating your form, click on the Google Sheets tab:

On your Google Drive account, create a new Google Sheet. Save it as something memorable.
You will need to grab the name of the sheet, the Google Sheet ID (directly from the URL of the sheet), and the Tab name (default is Sheet1).
Paste it in the fields below:
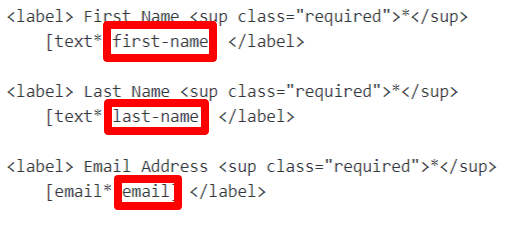
Once you have that, map the column names to the form field names you’ve chosen for your form. Pay close attention to the order of the field names. As you go down the form grabbing names, you need to paste them into the first row, moving from column to column, left to right.
Examples of the fieldnames below:
Test your form first to make sure the data is being pulled into your Google Sheet before releasing the form.