George Mason University Antonin Scalia Law School

Course Pages

Step 1: Create a New Document
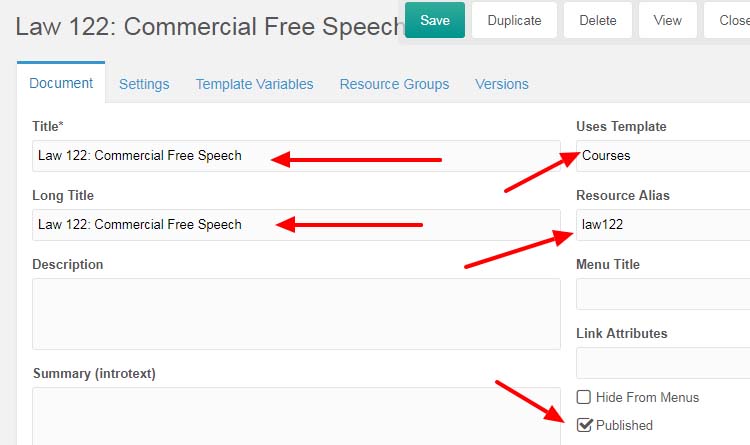
Step 2: Use the Courses Template and Fill in the Title, Long Title, & Resource Title with the course name. The Published checkbox is unchecked by default. Make sure to check it and hit save when you are complete.
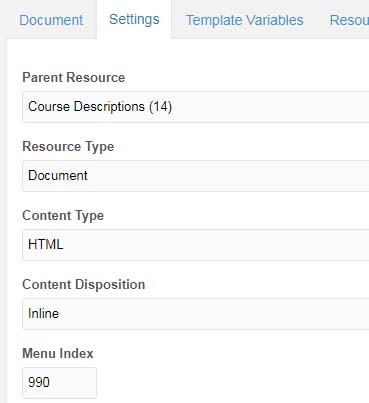
Step 3: Under the Settings Tab, use the following field entries in each field to keep all courses.
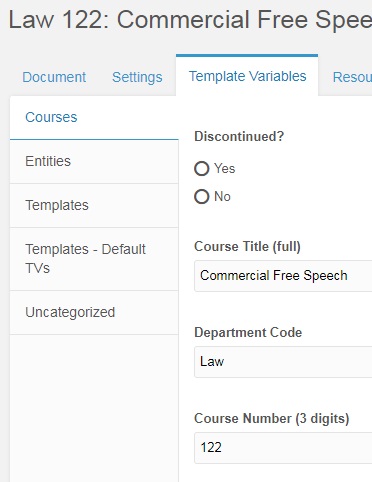
Step 4: Under the Template Variables Tab -> Courses Sub-Tab fill in the following fields:  Course Title, Department Code, Course Number, Credit Hours (minimum), Credit Hours (maximum), Subject Category, and Prerequisites (if applicable).
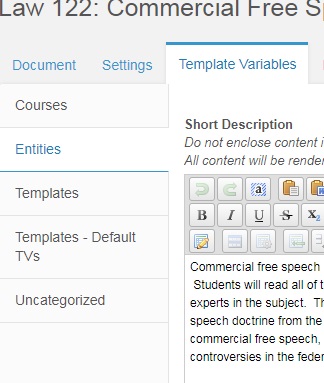
Step 5: Under Template Variables Tab -> Entities Sub-Tab, Copy and paste the course description under Short Description.
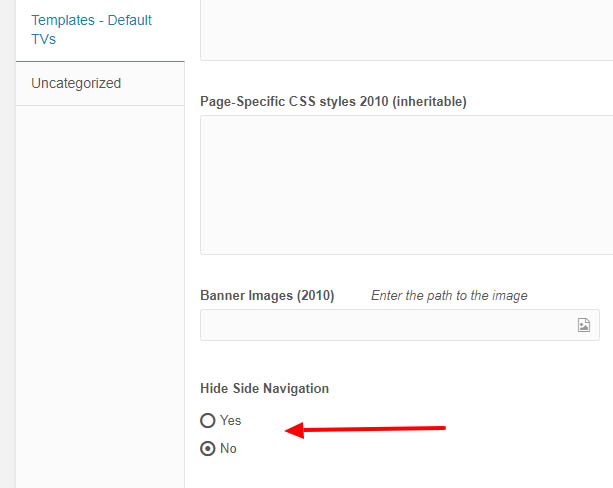
Optional: If you would like to hide the side bar, the option is under Templates-Default TVs as Hide Side Navigation.


Step 6: When finalized, make sure the Published checkbox is checked under the Document tab and Click on the green Save button.

Faculty and Administrative Bio Pages

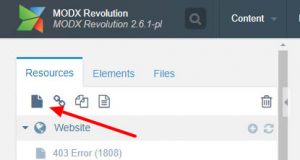
Step 1: Create a new Document by clicking on the Document icon under the MODX search bar.

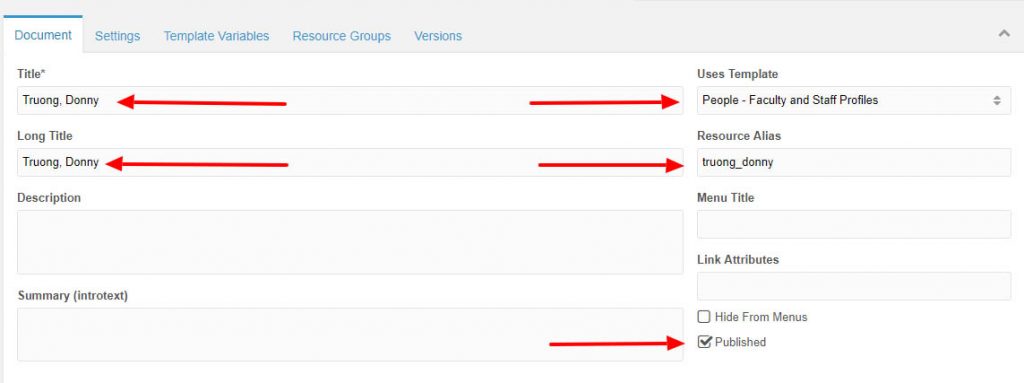
Step 2: Under the Document Tab, select the “People – Faculty and Staff Profiles” Template. Then enter the staff member’s Name under Title, Long Title, and Resource Alias in the format shown below. Please note that the Published checkbox will not be selected by default. When the Bio is complete, this box will need to be checked.

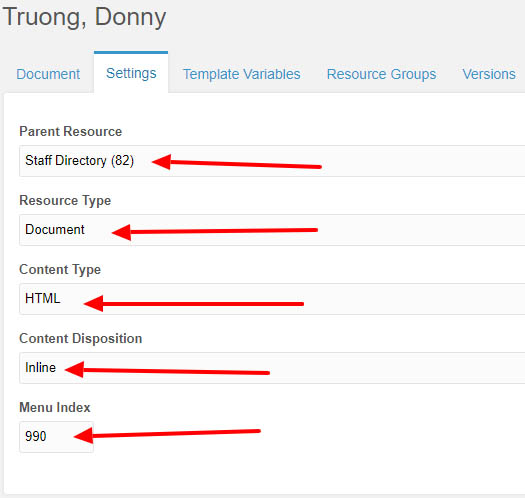
Step 3: Under the Settings Tab, Select the Parent Resource, and make sure the Resource Type, Content Type, Content Disposition and Menu Index have the following inputs:

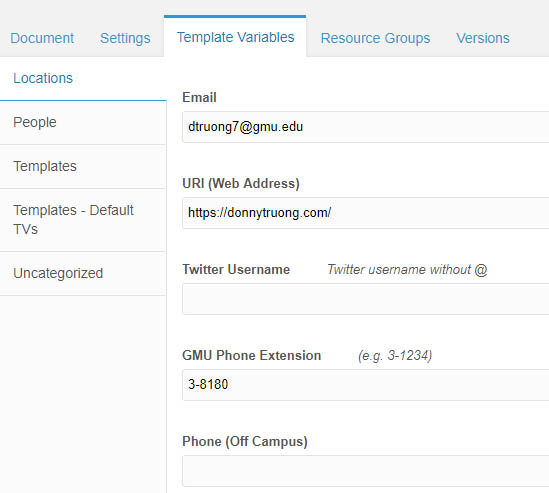
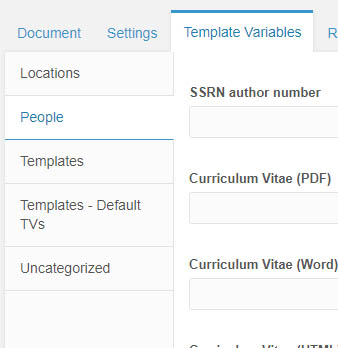
Step 4: The Template Variables tab will hold the majority of information for the Staff Member. Start with the Locations sub-tab. Here you will enter the Email, GMU Phone Extension, and Office Number.  Please note the phone extension must follow the correct format (3-xxxx).

Step 5: The People sub-tab under Template Variables is very important. Start with the First Name, Middle Name, Last Name, to title the Staff page. A staff banner photo may be uploaded to the Photo Large area when a photo is available.

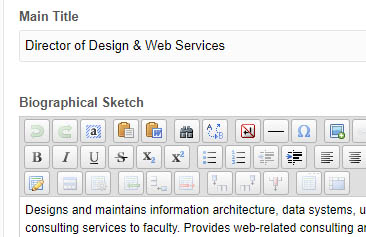
Scrolling down the People tab, enter the Staff Member’s professional title under Main Title, and include the Bio under Biographical Sketch. For Faculty, please select an Area of Expertise and Subjects Taught.

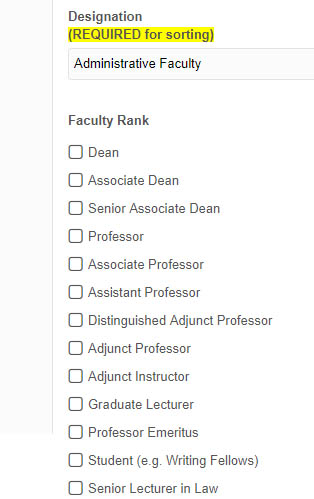
Further down, select the Designation, Faculty Rank,  Highest Degree Obtained. and Alma Mater. You may enter up to six additional degrees in this section.

Step 6. (Optional) To remove the sidebar which is set by default, scroll back up to the sub-tab area and select Templates – Default TVs. From there select Yes from Hide Side Navigation.

At this point the Staff Bio page has all the required information to display correctly. You will need to select the green SAVE button found at the very top of the page to save your work and publish your page.

Optional: You may add additional information such as uploading a resume, including a professional website link, or Twitter username found in the People and Locations sub-tab, respectively.


How to Renew SSL Certificate for law.gmu.edu

  1. Log into cPanel (GoDaddy) and go to SSL/TLS
  2. SSL screenshot

  3. Generate CSR and fill out all the information.
  4. Request SSL certificate from ITS. Submit a request to get a certificate.
  5. Once you get it from ITS, go back to cPanel – SSL and then go to certificates
  6. Then upload the .crt file that ITS gave you
  7. Go to Manage SSL Sites. Scroll down to the Install an SSL Website and click Browse Certificates. Select the certificate that you want to activate and click Use Certificate. Click Install Certificate.

Force Update of PDFs

When replacing an existing PDF, browsers don’t serve the latest version. They usually serve the cached version. To change that, we use Apache directives as below:

# Instruct browsers to always check for the latest version of your files using Apache directives
<IfModule mod_headers.c>
<FilesMatch "(?i)^.*\.(css|htm|html|gif|jpg|jpeg|js|png|pdf)$">
Header set Cache-Control "max-age=0,must-revalidate"
</FilesMatch>
</IfModule>

The instruction above includes more than just PDF.

Another solution is using ?ver=x.x in the URL. For example:

https://www.law.gmu.edu/assets/css/2015/style.css?ver=2.0

x.x could be any number.

Source: “How to force an update of cached files, images, favicon

Remove Periods from Degrees

For example, replace J.D. or L.L.M to JD or LLM.

Here’s the JavaScript method:

<script>
function removePeriods() {
var str = document.getElementById("c_degrees").innerHTML;
var res = str.replace(/\./g, "");
document.getElementById("c_degrees").innerHTML = res;
}
window.onload = removePeriods;
</script>

To do it in MODX, create a chunk called FixDegrees:

A.B.:AB,A.M.:AM,B.A.:BA,B.B.A.:BBA,B.C.:BC,B.Com.:BCom,B.E.E.:BEE,B.I.E.:BIE,B.F.A.,BFA:B.L.:BL,B.M.:BM,B.M.E.:BME,B.S.:BS,B.S.E.:BSE,B.S.E.E.:BSEE,D.Jur.:DJur,D.O.:DO,J.D.:JD,J.S.D.:JSD,J.S.P.:JSP,Ed.D.:EdD,Ed.S.:EdS,LL.B.:LLB,LL.D.:LLD,LL.L.:LLL,LL.M.:LLM,M.A.:MA,M.A.S.:MAS,M.B.A.:MBA,M.Ed:MEd,M.Fc.:MFc,M.L.I.S.:MLIS,M.L.S.:MLS,M.D.:MD,M.Ed.:MEd,M.S.:MS,M.Sc.:MSc,M.S.E.E.:MSEE,M.S.L.S.:MSLS,M.T.:MT,P.G.C.E.:PGCE,Ph.D.:PhD,Cert. of Legal Educ.:Cert of Legal Educ,M.P.P.:MPP,S.J.D.:SLD

Than create a snippet called ReplaceDegrees:

<?php
$find = array();
$replace = array();

$line = $modx->getChunk('FixDegrees');
$pairs = array_map('trim', explode(',', $line));
foreach($pairs as $pair) {
if (strpos($pair, ':') === false) {
$pair = $pair . ':';
}
$couple = array_map('trim', explode(':', $pair));
$find[] = $couple[0];
$replace[] = $couple[1];
}
return str_replace($find, $replace , $input);

Call the snippet in the template:

[[*bio:ReplaceDegrees]]

PHP Script Swapping out GA codes

This script was used to delineate Google Analytic Tracking codes between four different sites sharing the same wordpress theme files. Originally placed in footer.php above the GA tracking code provided by Google.

<?php
$host = 'https://' . $_SERVER['SERVER_NAME'] . $_SERVER['REQUEST_URI'];
if (strpos($host,'sls') !== false)
{
$gacode ="UA-792782-19";
}

elseif (strpos($host,'gai') !== false)
{
$gacode ="UA-792782-21";
}

elseif (strpos($host,'pep') !== false)
{
$gacode ="UA-792782-22";
}

elseif (strpos($host,'mvets') !== false)
{
$gacode ="UA-792782-23";
}

else
{
$gacode ="UA-792782-XX";
}
?>

The script checks the URL and replaces the $gacode variable with the correct analytics code inside the provided GA script.


<script>
(function(i,s,o,g,r,a,m){i['GoogleAnalyticsObject']=r;i[r]=i[r]||function(){
(i[r].q=i[r].q||[]).push(arguments)},i[r].l=1*new Date();a=s.createElement(o),
m=s.getElementsByTagName(o)[0];a.async=1;a.src=g;m.parentNode.insertBefore(a,m)
})(window,document,'script','https://www.google-analytics.com/analytics.js','ga');

ga('create', '<?phpecho $gacode; ?>', 'auto');
ga('send', 'pageview');

</script>

Using WordPress: Tips For Editors


How do I sign into Scalia Law Sites remotely?

Users must download a VPN client from the IT Services Downloads page. For iOS or Android devices, install the Cisco AnyConnect client through the appropriate app store.

Instructions for Windows
Instructions for Mac

Once installed, enter your desired the URL for your VPN group in the format vpn.gmu.edu/<group>. If you do not know your specific VPN group or do not have one, you may enter vpn.gmu.edu and click Connect.  Select GENERAL from the Group list and login with your NetID and Patriot Pass password. See VPN Groups for additional information and how to determine your group.

I can’t sign in because of 2FA. What is that and how can I get it?

Two-Factor Authentication (2FA) is required to connect to the VPN. If you are a Mason employee who uses the VPN to access Mason resources, you are encouraged to enroll in 2FA. This tool allows Mason employees to verify who they are before connecting to protected networks. An alert will go to your cell phone if you or someone else attempts to login using your credentials. You will then be prompted to approve or deny entry.

Enroll in 2FA .

How do I administer the site and take care of my content?

A user must first be given access to the site by the Director of Design and Web Services. Once an account has been created, simply add “/wp-login.php” to the end of the URL of the site you are working on. For example, to sign into sls.gmu.edu, the link would be sls.gmu.edu/wp-login.php.

How do I use the WordPress Dashboard?

Please refer to this short six minute video to get an overview of the WordPress Dashboard.

A more comprehensive look at the WordPress Dashboard is found below:

Of course, we are here to help. If you have any questions, please contact one the web administrators and we’ll gladly walk you through the process.

The Menu settings are found on the left side of the WordPress Dashboard under Appearance->Menus.

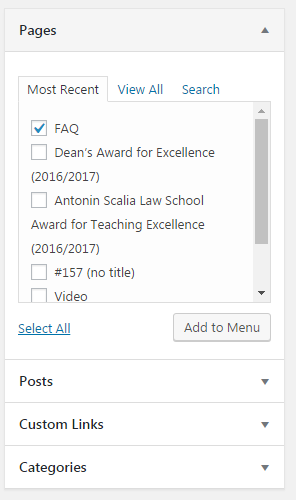
To the left of this page you will see various categories of items you may add to the Menu, such as pages or custom links. Simply check off the page you would like to add and click on Add to Menu for pages, or copy and paste a URL and give it a title under custom links.

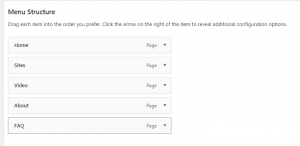
Once the Page or Link has been added to the Menu Structure window to the right, you may drag your selection up or down to prioritize your menu items. Dragging the item slightly to the right while under another item will create a child/parent item relationship making organization of links easier than ever.

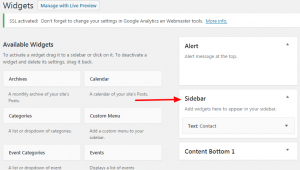
Sidebar content is called a Widget in WordPress nomenclature. Widgets can be found under Appearance-> Widgets. In order to add sidebar content to a page, you must first create the Widget in the Sidebar category.

Once the content has been created, you will need to add to the page. Under every editor view of a page, you will see the Custom Sidebar menu. Activate it by checking off the menu item, then select the Sidebar Radio button.

How do I embed videos from YouTube and Vimeo?

On any YouTube video, click on the Share button underneath the subscribe button. From there, simply copy and paste the Share link into the Edit Page window.

For Vimeo, copy the video URL and paste it into the Edit Page window. Example:

https://vimeo.com/220470204

Using MODx: Tips For Editors


How to Create Internal Links With Resources IDs

In MODX, Resource IDs are the numbers assigned to a Document. For example: About Scalia Law (2). To link to the about page, use the following code:

<a href="[[~2]]">About Scalia Law</a>

How to Create an Anchor Link

To point to an anchor link within a page, use the following shortcode.
<a href="[[~[[*id]]]]#anchorname">Anchor Name</a>

To point to an anchor link on a different page, use the following shortcode:
<a href="[[~2]]#mason">About Mason</a>

Source

Installing an SSL Certificate on Apache

DigiCert:

Godaddy:

Guide:

Once a certificate and key have been purchased and generated, you will need to upload the files to your server.

If FTP is enabled on the server I would recommend Filezilla or CyberDuck FTP Clients to upload your files.

Once the files are uploaded, SSH into the server and sudo mv the files into the /etc/ssl/ directory.

Next, setup your virtual host for port 443. Before you get started, make sure your server has an SSL Engine. If not, you may need to install mod_ssl. To run the mod_ssl install command use the following code:

yum install mod_ssl

Now you will be able to setup the virtual host by configuring the Apache mod_ssl module. On a standard install, the file may be located at /etc/httpd/conf.d/ssl.conf.

The default file will have a number of instructions interspersed between lines of code. The most important lines of code will need to be edited with your server and sites information. See below: (be sure to remove quote marks when entering your information)


...
SSLEngine on
SSLCertificateFile "/etc/ssl/signed certificate"
SSLCertificateChainFile "/etc/ssl/intermediate_certificate"
SSLCertificateKeyFile "/etc/ssl/private/key"

# Uncomment the following directive when using client certificate authentication
#SSLCACertificateFile /path/to/ca_certs_for_client_authentication

...

Test your Apache configuration using the following command:

apachectl configtest

If no errors have occurred, restart Apache to complete the SSL configuration. Use the following command:


apachectl stop
apachectl start

Your website will now have a green padlock when using the HTTPS protocol. To redirect all non secure traffic automatically to HTTPS, edit your site’s non-secure port 80 Virtual Host.

On a standard install, this file would be found in /etc/httpd/. Edit the virtual host using the following (be sure to remove quote marks):


ServerName "Site's url (don't include protocol) ex: mysite.example.com"
DocumentRoot "Site files directory ex: /var/www/html/site"
Redirect permanent /secure "Site's url with new secure protocol https://mysite.example.com/"

Restart Apache and you’re all set.

How to Upgrade MODX Revolution

  1. Clear the site cache and the two logs (Error Logs and Manager Actions under the Reports menu)
  2. Flush Permissions and Log Out
  3. Backup files and database through cPanel
  4. Use CPanel to delete all the files in the cache folder (core/cache).
  5. Download the latest version of MODX Revolution, unzip, and merge (not replace) with the current installation (folders: connectors, core, manager, and setup) via FTP client
  6. Change setup directory permissions (no sudo is required)
    cd public_html
    find setup/ -type d -exec chmod 755 {} \;
    find setup/ -type f -exec chmod 644 {} \;
  7. Go to law.gmu.edu/setup. Click next, next, next (maybe one more next) and that should be it.

Source: Upgrading MODX
Also check out Bob Ray’s guide for upgrade.