George Mason University Antonin Scalia Law School

Adding Class Notes in MODX

Instructions for adding Class Notes in MODX

  1. Navigate to the Class Notes directory (ID12416)
  2. Right click on an existing alumni, choose Duplicate from the dropdown.  Add a new name (last name, comma, first name. Example: smith, john). Check Redirect to duplicate. Select Make all unpublished. Hit Save.
  3. On the Document tab, change the name in the Long Title field with first name than last name (Example: John Smith).
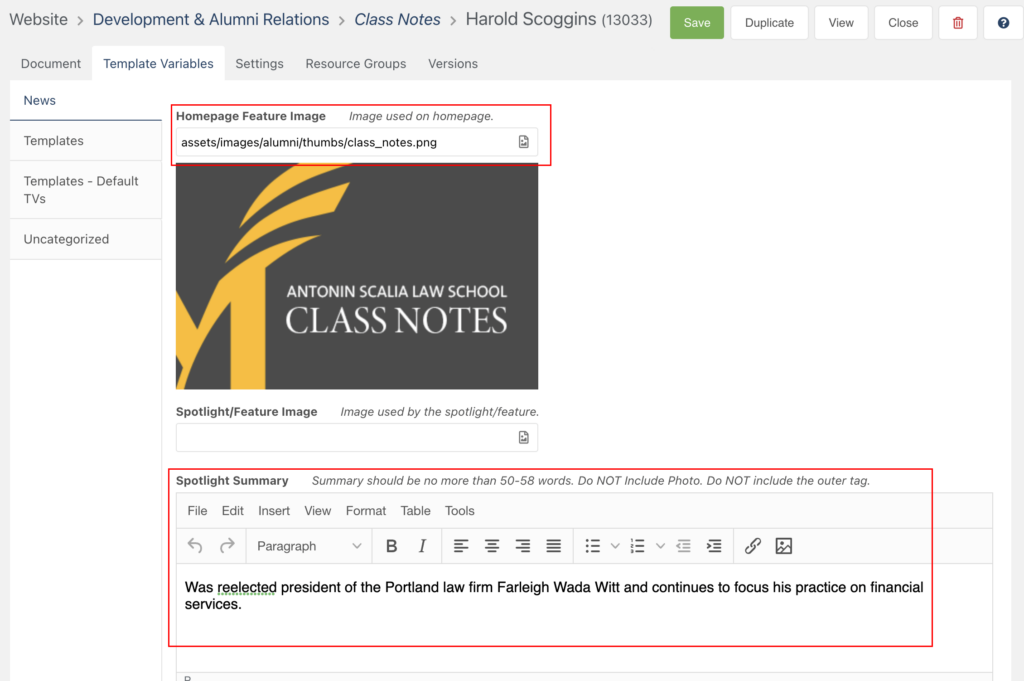
  4. Go to Template Variables tab,  upload the alumni photo to Homepage Feature Image field. Make sure the image is 400px by 250px. If no photo is provided, use the default image: assets/images/alumni/thumbs/class_notes.png
  5. Enter text in the Spotlight Summary field.
  6. Scroll down to the Class Year field, add the year in digits. Example: 1991
  7. Return to the Document tab, activate the Published button, enter the Publish On date, then hit the Save button.

How to Post Homepage Hero Banners

The hero banners are randomly loaded each time a visitor land on our homepage. Here are the steps to publish or unpublished them:

  1. Create two banners: desktop (1600px by 800px) & mobile (400px by 600px)
  2. Log into MODX then navigate to the Home Banners (ID#12335) directory
  3. Pick an existing resource and duplicate it. Paste in the text that corresponds to the banner (this text will also be use for the alt tag). Check the Mark All Unpublished radio button, then hit Save
  4. Go to the new duplicated resource, make sure the Title and Long Title are the same
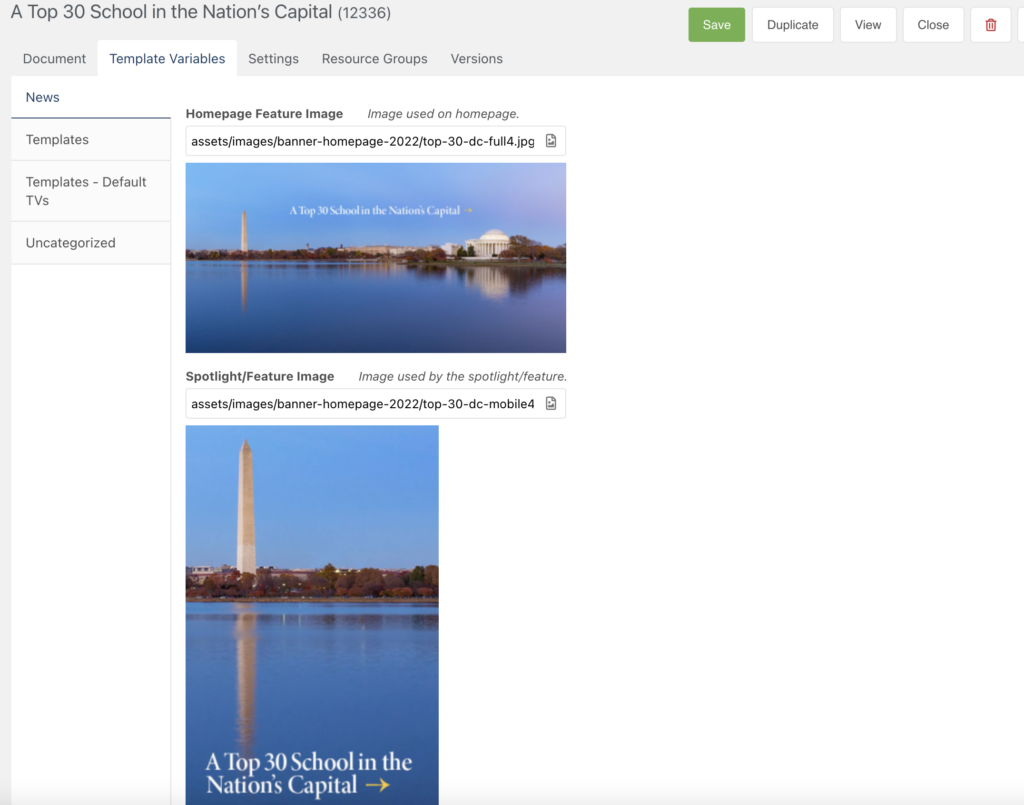
  5. Go to the Template Variable tab, upload the desktop version to Homepage Feature Image field and the mobile version to Spotlight/Feature Image (see screenshot)
  6. Scroll down to URL for In the News and enter a URL. A URL is required. If there’s no URL, the link will be defaulted to the homepage
  7. Go back to the Document tab,  activate the Published radio button and then hit Save. To remove the banner from the line up, deactivate the Published and then hit Save or delete the resource.

Emergency Alert Message

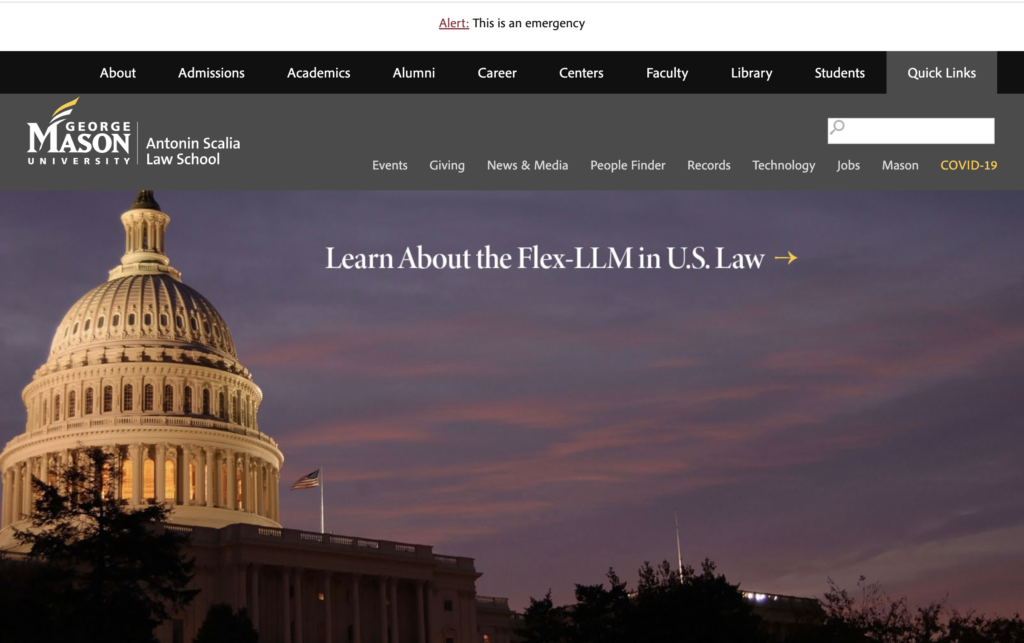
In case of an emergency, we have implemented an alert message that would appear on every page at law.gmu.edu. Here’s an example:

To Activate the Emergency Alert Message

  1. Log into MODX Manager, navigate to the Emergency container (id#12996), and open up the Emergency Message resource (id#12996).
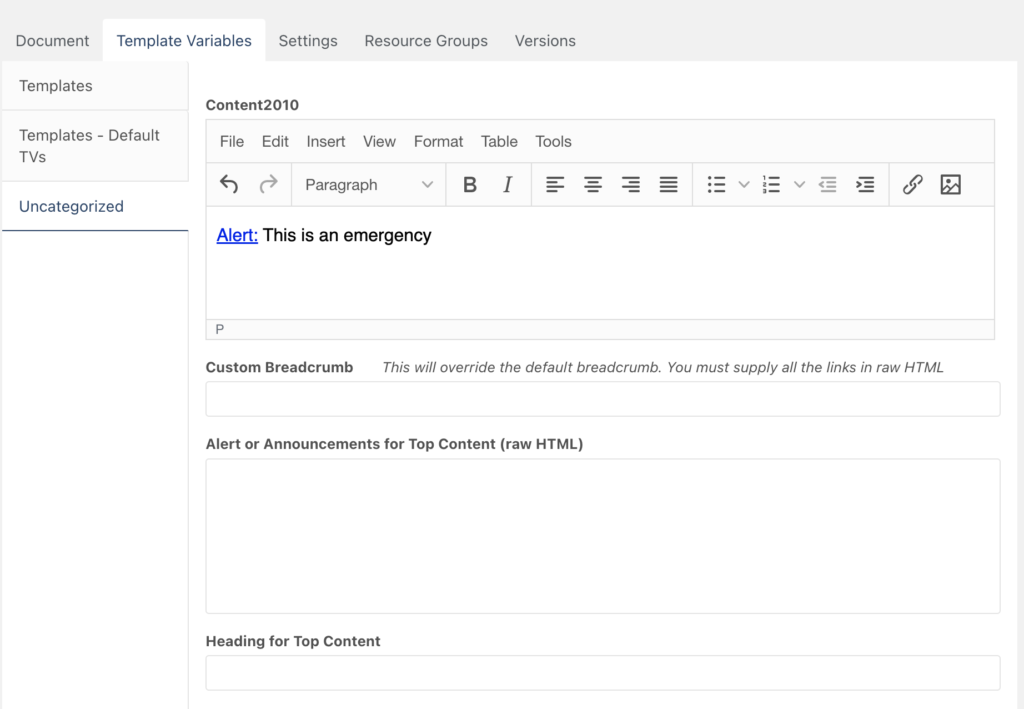
  2. Go to the Template Variables tab, select the Uncategorized tab on the left. Write an emergency alert message in the Content2010 box, which is the first box. Return to the Document tab, click on the Published button, then hit the Save button.
  3. Search for the 2012_template_top chunk, scroll down to this line (around line 29):
    [[-getResources? &parents=`12995` &depth=`1` &tpl=`emergency_alert` &tvPrefix=`` &includeTVs=`1` &limit=`1` ]]
    Remove the first hyphen (-) to activate GetResources. (Because we hardly used this emergency alert message, activating this snippet might affect the site performance when we are not using it)

To Deactivate the Emergency Alert Message

To deactivate the Emergency Alert Message, simply unpublished the Emergency Message resource (id#12996). Comment out the GetResource snippet (by adding the hyphen back into the 2012_template_top chunk) is not required, but a good practice to prevent an extra dynamic call.

CSS Style

CSS style for emergency alert can be modified in the emergency_alert chunk.

How to Disable Plugins Outside MODX Manager

Since we are using CAS Authentication plugin to add an extra security layer to our MODX Manager, we need a way to disable the plugin in case something goes wrong and we don’t want to get locked out of our own site. Here are the steps to disable plugins outside the Manager:

  1. Log into the cloud dashboard and temporarily add phpMyAdmin to the cloud
  2. Log into phpMyAdmin, browse the modx_site_plugins table for the CAS plugin, double-click on the disable column to change the value from 0 to 1 to disable the plugin
  3. Manually clear the cache by logging into sFTP and delete everything in the core/cache directory
  4. Log back into the cloud dashboard to turn off phpMyAdmin

Creating a Spreadsheet for Full-time Faculty

A request to pull the following information from the full-time faculty directory:

  • Last Name
  • First Name
  • Title
  • Degrees and Schools
  • SSRN link
  • Subjects taught
  • Area(s) of Expertise
  • CV (PDF link if they have one posted)
  • Email
  • Bio (link to profile page)

Create a chunk (ditto.faculty_list_2021_ABA) using tr and td tags:

<tr>
<td>[[+lname]]</td>
<td>[[+pref_name:default=`[[+fname]]`]]</td>
<td>[[+title_main]]</td>
<td>[[+degree6:isnot=``:then=`[[+degree6:ReplaceDegrees]]`]][[+alma_mater6:isnot=``:then=`, [[+alma_mater6]]; `]][[+degree5:isnot=``:then=`[[+degree5:ReplaceDegrees]]`]][[+alma_mater5:isnot=``:then=`, [[+alma_mater5]]; `]][[+degree4:isnot=``:then=`[[+degree4:ReplaceDegrees]]`]][[+alma_mater4:isnot=``:then=`, [[+alma_mater4]]; `]][[+degree3:isnot=``:then=`[[+degree3:ReplaceDegrees]]`]][[+alma_mater3:isnot=``:then=`, [[+alma_mater3]]; `]][[+degree2:isnot=``:then=`[[+degree2:ReplaceDegrees]]`]][[+alma_mater2:isnot=``:then=`, [[+alma_mater2]]; `]][[+degree1:ReplaceDegrees]][[+alma_mater1:isnot=``:then=`, [[+alma_mater1]]`]]</td>
<td>[[+ssrn:isnot=``:then=`https://ssrn.com/author=[[+ssrn]]`]]</td>
<td>[[+faculty_subject_category:convert_ids_to_pagetitles_1]]</td>
<td>[[+expertise:convert_output_list_1]]</td>
<td>[[+cv_pdf:isnot=``:then=`https://www.law.gmu.edu/[[+cv_pdf]]`]]</td>
<td>[[+email]]</td>
<td>https://www.law.gmu.edu/faculty/directory/fulltime/[[+alias]]</td>
</tr>

The square brackets ([[+lname]]) correspond with the form field inside MODX. To see how the fields were created, take a look at the 2015_faculty_profile chunk.

After creating the ditto.faculty_list_2021_ABA chunk, put it inside the script below:

<table>
[[getResources? &showHidden=`1` &includeTVs=`1` &tvPrefix=`` &limit=`0` &sortbyTV=`lname` &sortdirTV=`ASC` &parents=`5842` &depth=`1` &tpl=`ditto.faculty_list_2021_ABA` &sortBy=`lname` &sortDir=`ASC` &display=`all` &filter=`hide_all,1,2`]]
</table>

Past the script above on any page inside MODX to populate the table. The tag &parents=`5842` refers to the ID number of the full-time faculty directory.
Adding a New Gravity Form in WordPress

Steps for adding a new Gravity Form in WordPress:

  1. In WordPress nav bar, choose Forms (with Gravity Forms logo), then choose New Form
  2. Add Fields and update Field Settings (e.g., make a field required). Save Form and Preview it (top right)
  3. At the top of the Form Editor are Settings and Entries. Completed form submissions are located in Entries. In Settings are Form Settings, Confirmations, and Notifications:
    • Form Settings may be adjusted as needed
    • Confirmations are what the user sees after submitting the form. Defaults to Text and may be updated to Text, Page, or Redirect (use Redirect to send user to an external page after submitting the form). Conditional logic is also possible
    • Notifications are sent to admin by default when a form has been submitted (this includes tests in Preview). In Admin Notification, update ‘Send to Email’ field to update email address that will receive a notification when a form is submitted. Update other fields if needed. If needed, Configure Routing to send notifications conditionally based on form Field responses (be sure to update the ‘Any/All’ dropdown to reflect the desired logic)
  4. Create a Page for the form by clicking Pages, then Add New in left nav bar
  5. In the new page, add a title, which will autogenerate a permalink (editable)
  6. In the new page, add a shortcode to the Paragraph section to display the Gravity Form on the page. Copy shortcode from an existing page, replacing “ID” with the ID of the new Gravity Form (found in Forms area; see #1 above)
  7. Preview, then Publish page when ready. Share form via permalink (see #5 above)

Instructions for Restoring Course Schedules in MODX

  1. Duplicate the entire course schedule directory. For example: 2016 Course Schedule and rename it to 2015 Course Schedule.
  2. Open up the directory you just copied, select Duplicate of 2016 Fall. Rename Title and Long Title to 2015 Fall. Rename Source Alias to 2015_fall.
  3. Open up the static HTML page.
  4. Search ../../.. and replace with nothing (blank).
  5. Search for .html and replace with nothing (blank).
  6. Search for ../../courses/ and replace with /academics/courses/
  7. Search <img class="icon" src="assets/images/icons/pdf.png" alt="PDF file" width="16" height="16" /> and replace with nothing (blank).
  8. Search <br /><img src="/assets/images/icons/weather_sun.png" alt="" width="16" height="16" /> and replace with nothing (blank).
  9. Search <br /><img src="/assets/images/icons/moon.png" alt="" width="16" height="16" /> and replace with nothing (blank).
  10. Replace <img src="/assets/images/icons/pencil.png" alt="" width="16" height="16" /> and replace with nothing (blank).
  11. Copy the page starting from the list (ul) all the way down to the end of the table (<!-- END HERE-->).
  12. Add this class <div class="table-wrap"> before the opening table element and </div> after the closing table element to make the page responsive.

For anchor links on pages prior to modx, replace:
2000fall.html#
with:
[[~[[*id]]]]#

Add this to the top:

<ul>
<li><a href="[[~[[*id]]]]#schedule">Schedule</a></li>
<li><a href="[[~[[*id]]]]#assignments">Assignments</a></li>
<li><a href="[[~2481]]">Archives</a></li>
</ul>

Remove the following entirely:

<img src="https://www.law.gmu.edu/images/new.gif" alt="" width="25" height="12" border="0">

<img src="assets/images/icons/pdf.gif" alt="PDF Document" width="16" height="16" />

<span style="font-family: Arial,Helvetica,sans-serif;">

<span>

</span>

_2012summer001.html

Replace:

../../courses/

with

/academics/courses/

How to Connect Google Sheets to Contact Forms

After creating your form, click on the Google Sheets tab:


On your Google Drive account, create a new Google Sheet. Save it as something memorable.

You will need to grab the name of the sheet, the Google Sheet ID (directly from the URL of the sheet), and the Tab name (default is Sheet1).

Paste it in the fields below:


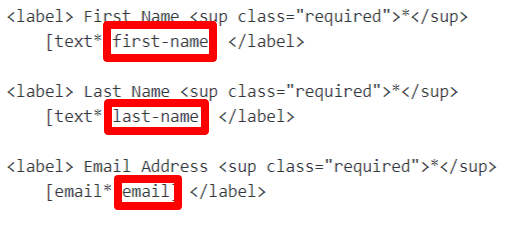
Once you have that, map the column names to the form field names you’ve chosen for your form. Pay close attention to the order of the field names. As you go down the form grabbing names, you need to paste them into the first row, moving from column to column, left to right.

Examples of the fieldnames below:


Test your form first to make sure the data is being pulled into your Google Sheet before releasing the form.

Creating “In the News” Content

“In the News” content can be found under Resource ID 11086 and should be contained within the year of posting.

The simplest way to create an “In the News” item is to duplicate an existing resource from an existing faculty. Once you make a duplication, uncheck the published radio button to prevent the resource from showing up in the public

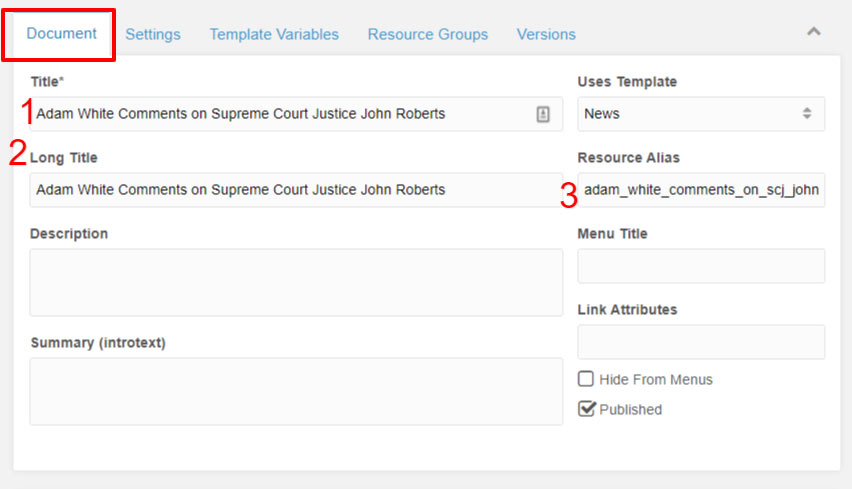
In fields 1 and 2, enter the headline of the content. For consistency, do not preface the name with “Professor”.

In field 3, enter a readable url that matches with the title of the content.

On the Template Variables tab, scroll down to “URL for in the News”. Enter the link to the article, and be sure to include the Source in the “Source for in the News” field below:

MODx comments

MODx comments will not appear when viewing the source code of a page. This is especially useful when trying to keep old banners on the homepage while having it out of sight.

To use MODx comments, use the following syntax:

[[- ]]